Market Profile is a powerful tool for understanding price behaviour, especially in sideways or balanced markets. It goes beyond traditional candlestick charts by combining time, price, and volume into a structured format that helps us visualise where the market is finding value and where it’s not.
First developed and widely used in futures trading, Market Profile has become increasingly popular in Bitcoin. It offers a clear way to read market intent, identify key areas of interest, and recognise when a breakout will likely succeed or fail.
What is Market Profile in Trading?
Market Profile, also known as Time Price Opportunity (TPO), is a method of organising market data into a profile that shows how much time price spends at each level.
Each session is divided into 30-minute blocks, each represented by a letter. Depending on the platform’s settings, the letters can be hidden.
Over time, these letters stack up, giving a visual distribution of price acceptance.
This profile makes it easier to spot important levels like:
- The Point of Control (POC) – the level where the most time was spent.
- The Value Area – the range where 70% of the activity occurred.
- Single Prints, Buying/Selling Tails, Poor Highs and Lows.
By using the Market Profile, we shift from simply reacting to price to understanding market context and where value is building.
Market Profile vs Volume Profile
Market Profile and Volume Profile focus on different types of market activity. While the volume profile shows where most contracts were traded, the market profile shows where the market spent time, which is a key difference.
- Market Profile (TPO) is based on time. It shows how long the price stayed at a certain level. The more time spent, the more the market accepts that price as fair value.
- Volume Profile is based on volume. It reveals how many contracts were traded at each price level. It’s especially useful for spotting levels with strong participation or identifying areas where big players are active.
One of our most valuable techniques is comparing the Time POC with the Volume POC to spot discrepancies.
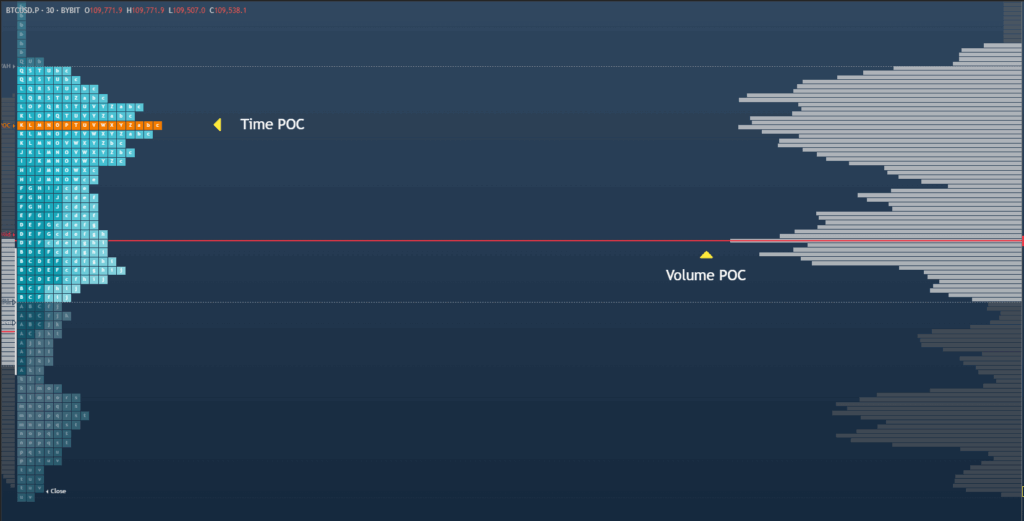
If the price spends a lot of time at the highs (Time POC), but the volume does not follow the move and is located lower (Volume POC), that may suggest a weak move that’s likely to reverse.
Adding Market Profile and Volume Profile Indicator in TradingView
To analyse both Time POC and Volume POC on the same chart in TradingView, the best way is to combine two indicators:
- Session Time Price Opportunity (STPO)
- Session Volume Profile (SVP)
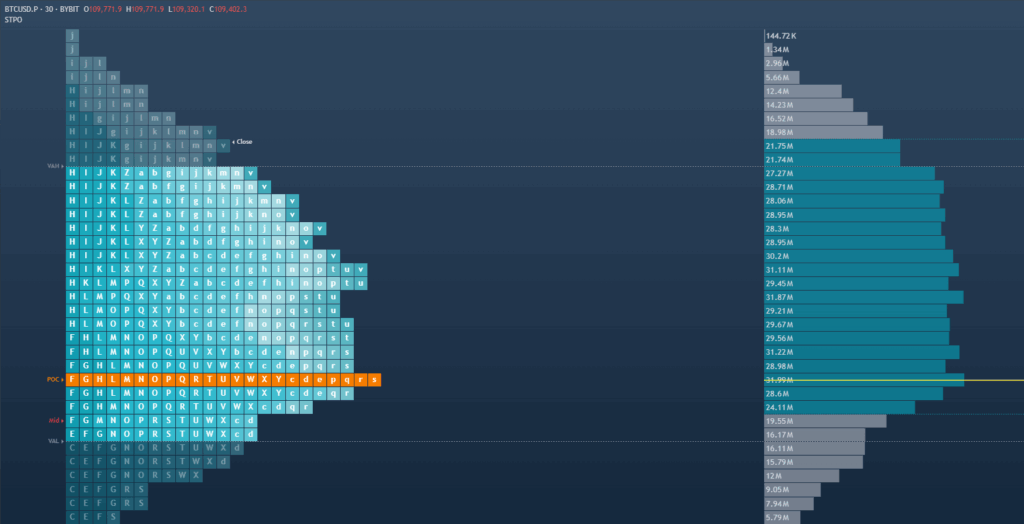
The STPO indicator lets you visualise the Market Profile and a basic Volume Profile by default, which makes it a great starting point. Below is a picture of what it looks like in TradingView.
However, you may want more flexibility and customisation regarding volume settings, such as row size, session splitting, or highlight colours. In that case, adding the Session Volume Profile (SVP) indicator will give you greater control.
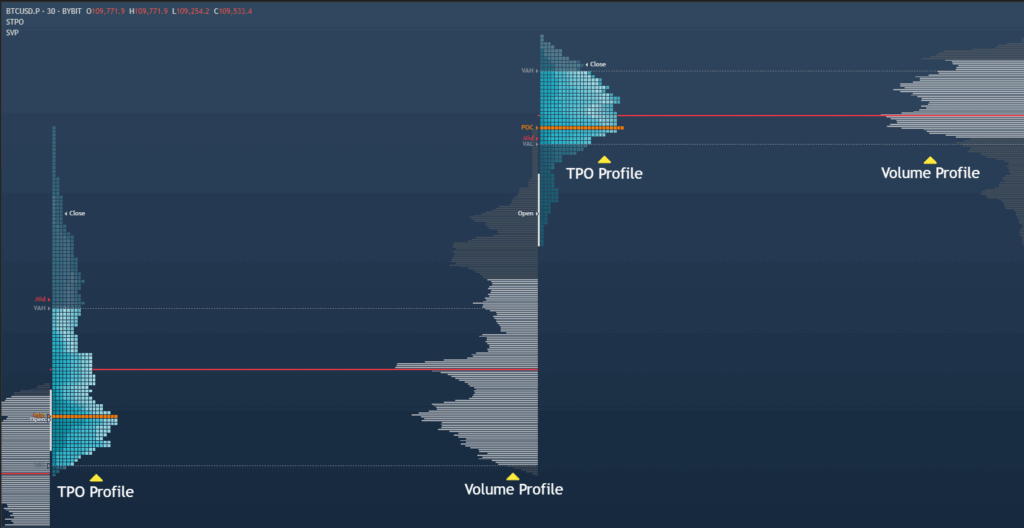
This combination lets you clearly compare time and volume distributions side by side, helping you spot important discrepancies and key trading levels effectively.
Key Components of Market Profile
We have covered Value Area and Point of Control. Now, it’s time to explore other concepts that are part of the TPO market profile and offer trading opportunities.
Initial Balance (IB)
The initial balance represents the price range formed during the first hour of trading and consists of the first two blocks of the TPO, which are labelled as letters A and B.
- Narrow Initial Balance generally leads to a range extension. It can result in days resembling “P” or “b” shapes used to interpret buyer or seller strength.
- A wide Initial Balance generally leads to a more balanced day, with the price staying within that range.
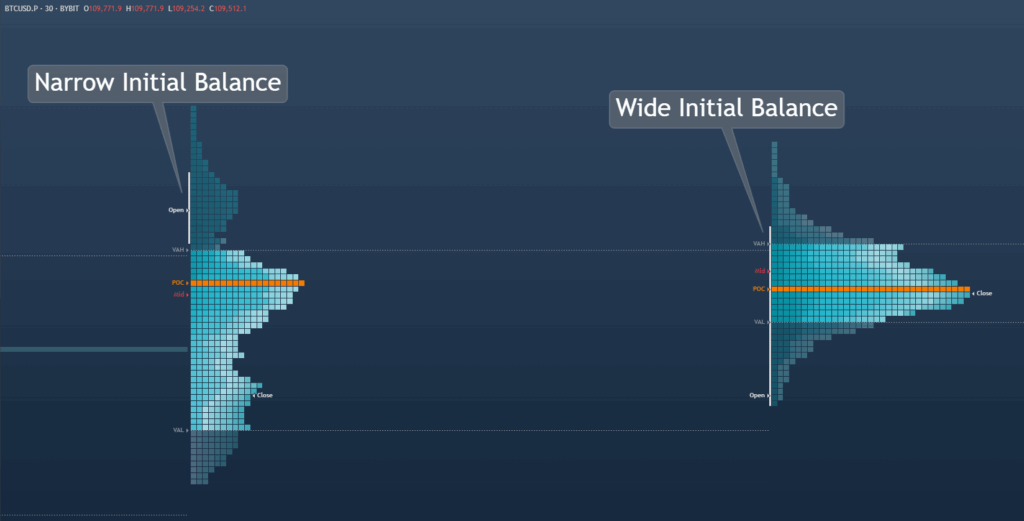
In TradingView, we can highlight the initial balance on the STPO settings. In this picture, the initial balance appears in white.
Single Prints (SP)
Single prints are printed by only one TPO letter. They appear on a chart when the price moves quickly, showing no interest in trading at those levels. Thus, Single prints generally show a lack of agreement between the participants.
They are very similar to gaps in traditional markets, and because of this, we trade them like that:
- If the price is trading above the Single Print, the top of the SP row acts as support.
- If the price is below the Single Print, the bottom of the SP row acts as resistance.
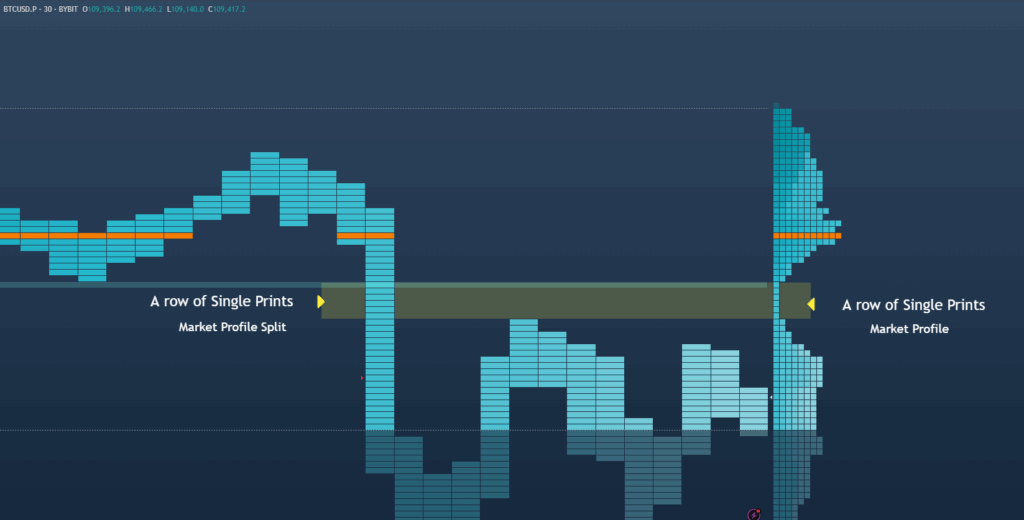
We expect the entire row to be filled once we see acceptance into the SP area, with increased volume and open interest.
These setups tend to be quick and clean trades as the price often moves rapidly through the SP zones due to the lack of established support or resistance.
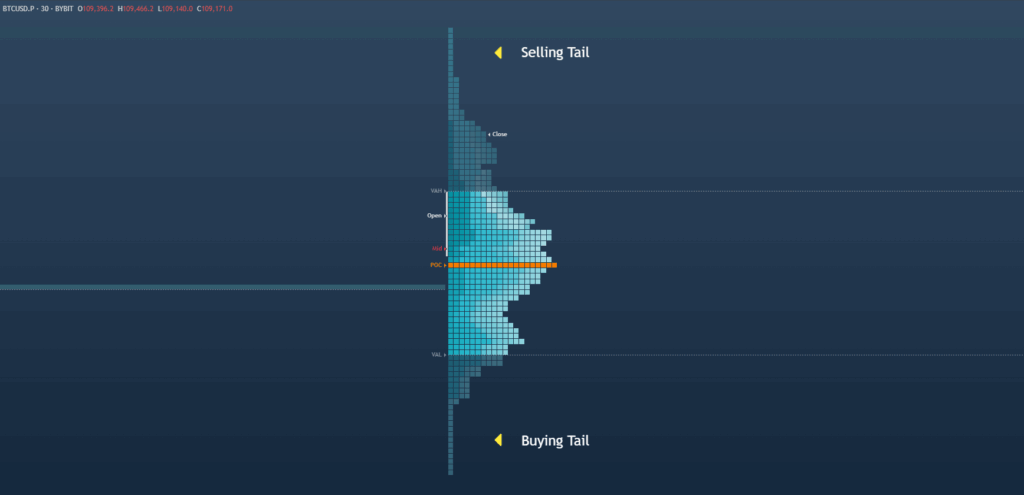
Buying Tails and Selling Tails
Buying Tails (BT) and Selling Tails (ST) are special types of Single Prints that form at the lows or highs of a TPO profile. These tails represent strong rejection at the extremes of the TPO profile and show larger traders stepping in.
- A Buying Tail forms at the bottom of the profile, indicating buyers quickly rejected lower prices.
- A Selling Tail forms at the top of the profile, showing that sellers stepped in to prevent higher levels.
Poor Highs and Poor Lows
When the TPO profile ends without a Buying or Selling Tail, a Poor High or Poor Low forms, meaning there was no clear rejection at the top or bottom of the session.
This usually suggests that the auction process was incomplete and that the market may come back to “finish the job.”
- A Poor High is a session high with two or more TPO letters stacked at the same price level, and no ST.
- A Poor Low is a session low with two or more TPO letters stacked at the same price level, with no BT.
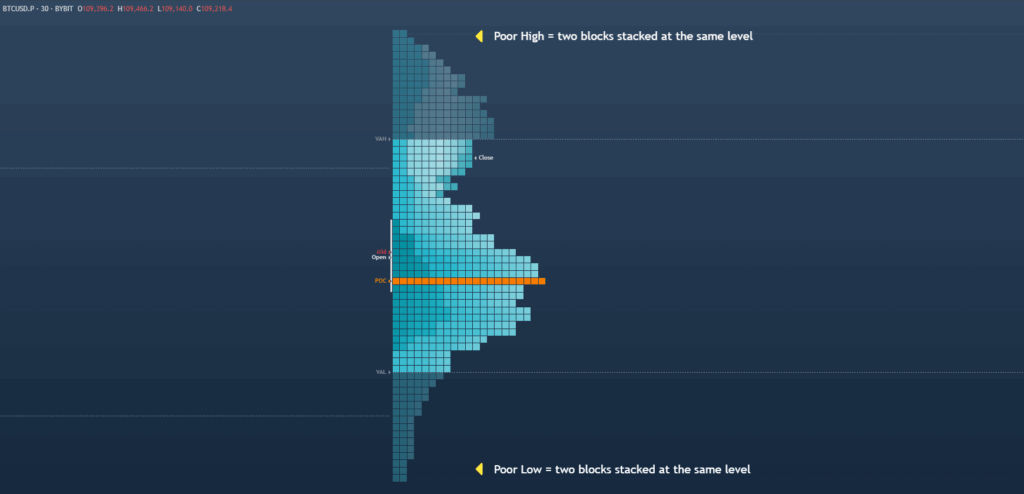
Poor highs and lows are considered weaker levels, and when a profile leaves one behind, it’s often a sign that the price may revisit that area. A poor high suggests the highs are likely to be taken out on the next upward move. A poor low may be swept on the next move down.
When price approaches one of these areas, we stay alert for either a clean breakout or a Swing Failure Pattern (SFP). Depending on the context, they can offer strong trading opportunities.
Market Profile for Day Traders
Day traders widely use Market Profile to identify key intraday levels. It’s ideally suited for day trading since it’s built around 30-minute time blocks.
Concepts like the Initial Balance, Single Prints, and Tails help traders understand the market context and build solid arguments to find the next A+ setup.
While the concepts may seem complex at first, Market Profile is suitable for beginner traders willing to take the time to learn.
Conclusion
Time plays a crucial role in understanding market context, which is why traders widely use Market Profile. Learning to interpret time-based structure early in your trading journey is key to starting off on the right foot.
Reading Market Profile charts helps traders move beyond guesswork and build solid, data-backed arguments for A+ setups.
At Chart Champions, we teach you how to read a Market Profile step by step and apply its concepts. Our method is easy to understand and integrate into your trading routine.